November 18, 2015

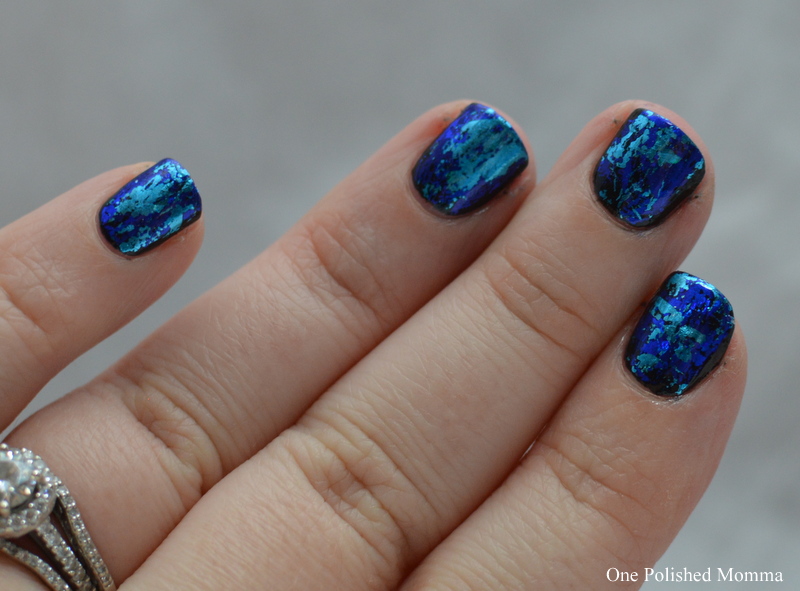
Hues of Blue Foils


I used my favorite black of all time, Opi's Black Onyx, to lay down a base color for the foils. Unfortunately the foils I have don't have a name or number on them. I purchased them from china from a no name company. One is a darker navy blue and the lighter shade is a sky blue shade. You can of coarse use any color foil you like. I used the foil glue that I got in a set from Sally's to make the sticky base. You can have to be careful and try to lay down as thin of a coat as possible. Once the opal glue turns clear after a few minutes you are ready to apply your foil. I did it in patches as opposed to a whole application. I just lightly touched the foil in sections to my nails and then would go back over those empty spots with the other color. I went back and forth between both foils until I liked what I saw. The most important part of foil application is your top coat. They do make a special top coat for them but I don't see the point in wasting the money. All you need is a slower drying top coat or even a clear polish. Quick dry top coats tend to cause the foil to wrinkle. If you are ok with that look then go for it. I actually used my Opi Top Coat first and then once that was dry I used my Seche Vite. The Opi gives a barrier between the foils and Seche Vite and keeps them from wrinkling up.


Social Medias>>
Instagram: Onepolishedmomma
Twitter: Onepolishedmom
Facebook: Onepolishedmomma
Snapchat: Onepolishedmomma


I hope you all have a wonderful day!
-Samantha

November 11, 2015

Copper Autumn Leaves


As you can see by the sad state of my nails I have been having a lot of breaks over the past few weeks. I apologize for taking so long in between posts but they were honestly such bad breaks, all the way down past the quick, that I didn't really want to fool with them at all. I have finally nursed them back to the point where they aren't totally ratchet looking with nail art. They still have a ways to go before back to a good length but I should be able to keep doing nail art from now on.

I started out using two coats of Opi My Vampire is Buff for the nude base. While I was letting it dry I went in with plate BM-H11 from Bundle Monster and Mundo de Unas black and stamped all the leaves on the multiple stamp heads I have. It saves a bunch of time doing it over on several stamper heads as opposed to having to do it one nail at a time. I filled in the center of the leaves with Essie's Penny Talk and then went in with Orly's Flagstone Rush to fill in the rest of the leaves. By the time the stamp was dry to the touch my base color was dry as well. I used firm pressure to stamp the image on to my nails. Since it was minimal clean up all I did was take a brush and some acetone to the bits on my skin. After I pressed every loose piece down with my finger I went in with Kb Shimmer Quick Dry Topcoat to finish all my design.


Social Medias>>
Instagram: Onepolishedmomma
Twitter: Onepolishedmom
Facebook: Onepolishedmomma
Snapchat: Onepolishedmomma


I hope you all have a wonderful day!
-Samantha

October 30, 2015

Tropical Bird Halloween Makeup


Face>>
Too Faced Hangover RX
Lancome Teint Idole Ultra 24h Foundation in 100 Ivoire N
Urban Decay Naked Concealer in Fair Light
Laura Mercier Loose Translucent Setting powder for under the eyes and whole face


Cheeks>>
Sephora Los Cabos Blush to contour
Milani Luminoso blush
Nyc Montauk Bronze bronzer
Laura Geller Gilded Honey illuminator


Brows>>
Anastasia Brow Wiz in Soft Brown on outer 2/3s
Lorac Pro Brow Pencil in Blonde on inner 1/3


Eyes>>
Nars Pro Prime Eye Shadow Primer
Nyx Jumbo Pencil in Milk
Urban Decay Slowburn in the crease
Urban Decay Savage on the lid and crease
Makeup Geek Blacklight duochrome shadow right in the center of savage
Tarte Super Mom from the Tartelette palette as a brow bone highlight and to blend the orange out
Nyx Matte black liquid liner
Bare Minerals Lash Domination mascara


Lower Lash Line>>
Lorac Front of the Line Pro Liner in Nude on the lower waterline
L'Oreal Voluminous Smoulder Black eyeliner on upper tightline
Urban Decay Freak 24/7 pencil set with Urban Decay Freak
Bare Mineral Lash Domination mascara


Lips>>

Colourpop Lippie Pencil in Easy
Lorac Girl Next Door lipstick
Buxom Full On Lip Polish in Sandy


Social Medias>>
Instagram: Onepolishedmomma
Twitter: Onepolishedmom
Facebook: Onepolishedmomma
Snapchat: Onepolishedmomma


I hope you all have a wonderful day!
-Samantha
October 29, 2015

Peacock Halloween Makeup


Face>>
Too Faced Hangover RX
Urban Decay Naked Skin Foundation in 2.0
Urban Decay Naked Concealer in Fair Light
Laura Mercier Secret Brightening Powder to set under the eyes
Laura Mercier Loose Translucent Powder to set the face


Cheeks>>
Sephora Tranquil Blush to contour
The Balm's Mary-Lou Manizer to highlight cheeks, nose, and cupid's bow
Milani Luminoso blush


Brows>>
Anastasia Brow Wiz in Soft Brown on outer 2/3s
Lorac Pro Brow Pencil in Blonde on inner 1/3


Eyes>>
Nars Pro Primer Eye Shadow Primer
Urban Decay Chaos in the inner corner
Urban Decay Fringe on the outer corner and crease
Makeup Geek Creme Brulee to blend out the crease colors
Makeup Geek Peach Smoothie to further blend out the crease colors
Makeup Geek Fortune Teller Foiled Shadow in the inner corner
Nyx Matte Black Liquid Liner
L'Oreal Telescopic Carbon Black Mascara


Lower Lash Line>>
L'Oreal Smouldering Pencil in black in the waterline and tightline
Urban Decay Urban on the inner half of lash line
Urban Decay Fringe on the outer half
L'Oreal Telescopic Carbon Black mascara


Lips>>
Rimmel Exaggerate lip liner in Eastend Snob
Rimmel Show Off Lip Lacquer in Celestial
Buxom Lip Cream in Pink Lady in the center


Social Medias>>
Instagram: Onepolishedmomma
Twitter: Onepolishedmom
Facebook: Onepolishedmomma
Snapchat: Onepolishedmomma


I hope you all have a wonderful day!
-Samantha